When changing the electrician in the apartment, you need to know exactly where and which electrical points will be installed, so you need to start this process with the development of a wiring diagram, and it cannot be otherwise. It is impossible to start installation without a diagram, one without the other is impossible, any professional electrician knows this.
When developing a wiring diagram, many questions arise, such as the choice of the cross-section of conductors, the installation location of sockets and switches, the planned load, depending on the power of electrical appliances, as well as the protection of the circuit itself, electrical appliances and a person from emergency operation. Therefore, when repairing electrical wiring, or completely replacing it, these issues should be given maximum attention.
If, for some reason, the existing wiring diagram of the apartment does not suit the owner, for example, because the current loads do not match the cross section of the conductors, the location of sockets and switches, or for some other reason, you should think about repairing the wiring and turn to electricians for help . Unless of course you yourself are not an expert in this field.
In many apartments, the aluminum wiring scheme is still in operation, at the time when it was designed and these buildings were built, there were no such large electrical loads, and the requirements for the wiring diagram of apartments were different.
No ground conductor, use aluminum wires when installing wiring, the lack of high-quality protection (RCD, modern automatic machines) are the main, but far from the only disadvantages of outdated circuits. The operation of such electrical wiring can be dangerous to human life.
So, as many people install in their apartments instead of jacuzzi bathtubs to which a voltage of 220 V is supplied, the wiring diagram of the apartment must be three-wire, have three wires phase, zero, earth, and the line must also be protected by an RCD, the same requirement applies to on other electrical appliances such as washing machine, electric oven, dishwasher, etc. Sometimes there are fires due to a short circuit in the old electrical wiring.
If all this is not indifferent to you, you should determine how old your wiring is, what work needs to be done to correct the current situation, repair the wiring or only partially replace it, what materials to buy? But it is better to entrust all this to our professionals! What will be the wiring diagram of the apartment? It all depends on how many rooms in the apartment, on the power consumption, on the number of electrical appliances.
Typical wiring diagrams in the apartment.
When developing a circuit, an electrician must necessarily take into account such nuances as the location of sockets and switches in rooms so that they are not subsequently covered by furniture. If you contact us, we will take into account all the points, grounding of electrical appliances, power and selection of the conductor section, installation of modern protection (RCD, automatic devices).
So, if the apartment has a standard layout, you can use the ready-made scheme developed for typical apartments by making minor adjustments. It is shown in the figure below.
Figure 1 is a schematic diagram of the electrical wiring of the apartment.

Figure 2 is a single-line wiring diagram of an apartment.
A mandatory requirement is the installation of a potential equalization system. To do this, it is necessary to connect the ground bus to the ground with a separate wire. electrical panel with cold pipes hot water and sewerage, as well as with a bathroom, which is shown in the diagram in Figure 2. The rules for the implementation of the potential equalization system are defined by the IEC 364-4-41 standard and paragraphs. 1.7.82, 1.7.83, 7.1.87, 7.1.88 PUE 7th edition.
This diagram shows the connection of the wiring of the apartment to the three-phase power supply of the riser of the house. A VVG 5 * 16 brand cable enters the apartment shield from the floor shield, that is, the input to the apartment. The input is a five-wire cable from which the entire apartment is powered. N is the working zero. L1,L2,L3 are phase numbers. PE is protective earth.
The switchboard in the apartment is arranged as follows: the input cable is connected to the introductory machine, jumpers go from the introductory machine to group machines, the lighting network, the socket network and other electrical appliances with a cable or bus.
We draw up a wiring diagram for the apartment.
First, you need to find out what electrical appliances will be used in the apartment and where they will be installed. Let's start with the kitchen, as the most powerful appliances are traditionally concentrated in this place. One of them is an electric stove, on which a separate cable is laid from the electrical panel of the VVG 3x6 brand and a separate machine is installed. A separate cable is also laid directly from the shield to other powerful electrical equipment, such as a washing machine and dishwasher, water heater, underfloor heating, and air conditioning.
For the rest of the sockets in the apartment, you can pass a common cable to the junction box, and from it you can already wire the cable to each socket or block of sockets. We will do the same with lighting, we will throw a common wire on the box, and from the box we will make the wiring to the lamps and switches.
Thus, we get a scheme in which the power supply of the entire load of the apartment is divided into group lines. Such as lighting group, household socket group, power socket group.
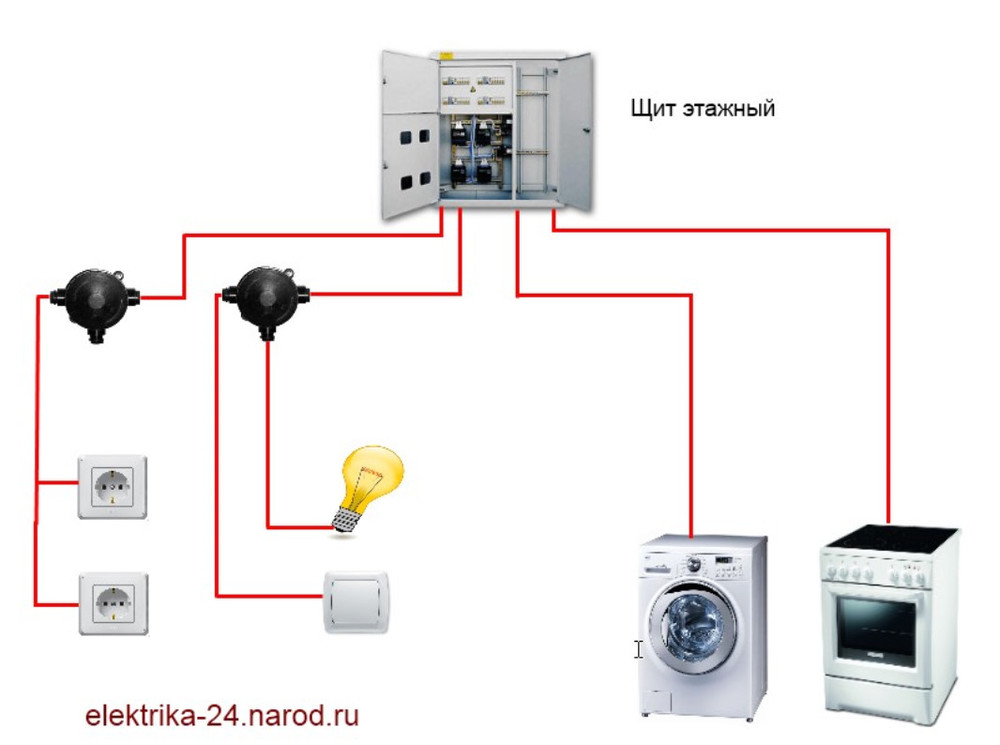
Figure 3. Simplified block diagram of the electrical wiring of the apartment.
Having drawn up a schematic diagram and knowing the area, cable laying locations, installation locations for sockets and switches, you can begin to calculate the amount of materials that will be required for installation. The wiring diagram of the apartment will help us calculate the cable footage, the number of sockets and switches, purchase the right number and type of machines, and choose an electrical panel.
Here are a couple more diagrams that will be more understandable to those who don't. professional electricians or people who have a superficial understanding of electricity. The diagram shows the cables circuit breakers as well as electricity consumers.
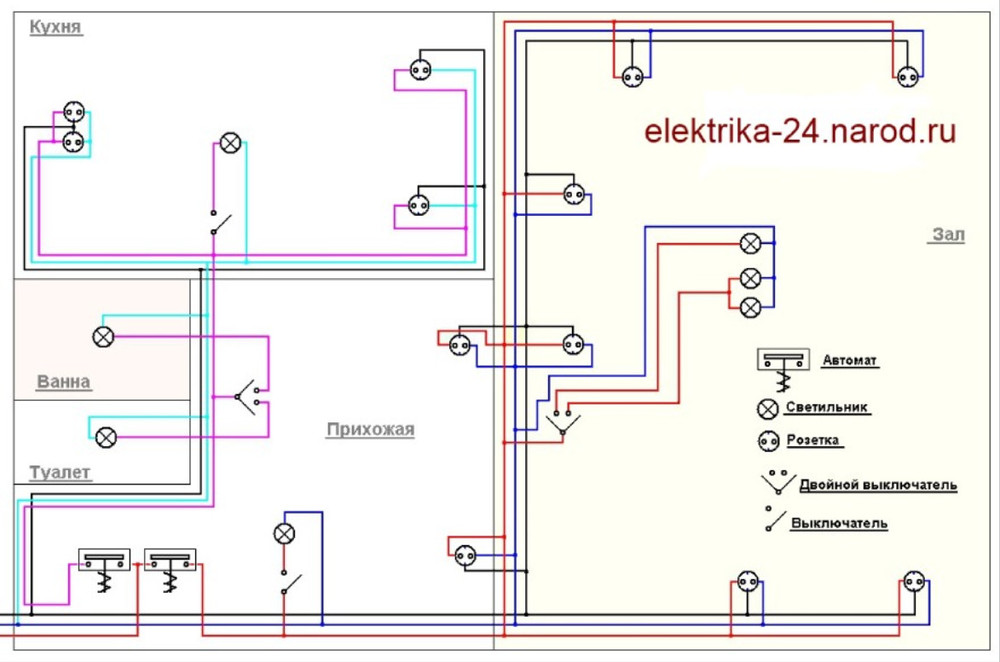
Figure 4 circuit diagram electrical wiring one-room apartment.

Figure 5. Structural diagram of the electrical wiring of the apartment.
- Shield plastic case
2. Clamping elements of zero working conductors
3. Clamping element of zero protective conductors, as well as a potential equalization conductor
4. Clamping element of input terminals of protective devices of group circuits
5. Residual current switch (RCD)
6. Machine guns
7. Group lines
How to determine the scheme of an existing electrical wiring.
It is not difficult to determine how the wiring in the apartment is done if you know some of the rules by which it is laid. Installation schemes may be different depending on the type of house and on the year of its construction, but it is still possible to determine the wiring layout for the apartment.
in brick houses wiring can be done in two ways. The first way is the upper wiring not lower than 15 cm from the ceiling level. At the same level, junction boxes are placed, from which descents are made to sockets and switches. All wires are laid strictly vertically and horizontally in the shtrabe. Cables for lighting are laid in ceilings, in which there are voids (channels).
The second way is the bottom wiring, when the cables are laid in pipes along the floor and filled with a screed, the cables rise vertically from the floor to the junction boxes and the wiring is already being done from them. Lighting is also carried out in the channels of ceiling ceilings.
In panel houses, Khrushchev electrical wiring is carried out in the channels of the plates. Channels for wiring, places for installing sockets, switches, are made at the factory during the manufacture of plates. All channels converge into junction boxes, from which channels go to the electrical panel. In panel houses, channels are often made not vertically and horizontally, but along the shortest path, that is, along an oblique line.
In some Khrushchev houses, the wiring for powering sockets is thrown under your floor, and the wiring for lighting under the floor of your neighbors is from above.
At the end of the topic, a few useful tips. If you are doing electrical repairs.
The installation height of sockets and switches from the floor level can be any, the main thing here is that it is convenient for you to use them. In general, there is one according to which sockets should be at a height of 30 centimeters from the floor, and switches - 90 centimeters. In general cases, this placement is usually the most convenient. But sockets in the kitchen would obviously be more appropriate to place above the desktop surface. The same situation is with the desk.
It is better to connect stationary household appliances, such as an extractor hood, a heated towel rail, a water heater, through a terminal block. Because it is unlikely that you will often use the outlet, and there is not much point in it.
Sockets for the Internet and a TV can be combined into one unit. Thanks to this, you can simultaneously carry out installation low current network and electrical wiring. Decide on the installation site of the low-current shield, whether you install it in the apartment or lead the wires to the floor shield. Choose the most convenient and profitable option.
Wire connections, twists, terminal blocks should be located only in junction boxes, otherwise, after the operation of the wiring, you will not be able to withdraw the wire to connect any devices, if necessary. As a rule, one box is installed in each room, but if there are many electrical outlets in the room, the wires may not fit in one box, so in this situation it is better to install two boxes.
Good afternoon! Today I will talk about the basic principles and typical schemes for laying electrical cables and wires. by apartment or house. In these cases, it is visually difficult to determine their location, because hidden electrical wiring is used, which goes inside concrete walls or under plaster.
Very often my friends and acquaintances ask me how and where is it laid or at home? To which I always answer that it is necessary to look for each specific case.
In his practice as an electrician, I've seen dozens of different wiring diagrams electrical wires. But all of them can be divided according to the general principles of organization into separate groups, depending on the year and type of construction (panel, brick, wooden house).
The main purpose of this article is to help readers without electrician experience independently figure out whether how do electrical wires or cables go through your house or apartment. This information will be useful to all those who are going to repair, replace the wiring with their own hands, move or add a lamp, socket or switch.
It is also very important to know where the wires go so as not to break through them when drilling or gouging the wall, because the place of damage is quite difficult.
Electrical wiring in the apartment. Schematic diagram.
Any electrical wiring is mounted from the storey or an individual (for a private house) electrical panel, from the machines of which 2-3 groups leave for an apartment. If the house does not have a gas stove, but only an electric stove, then an additional one straight line with a cross section of 6-10 square millimeters will be laid to it.
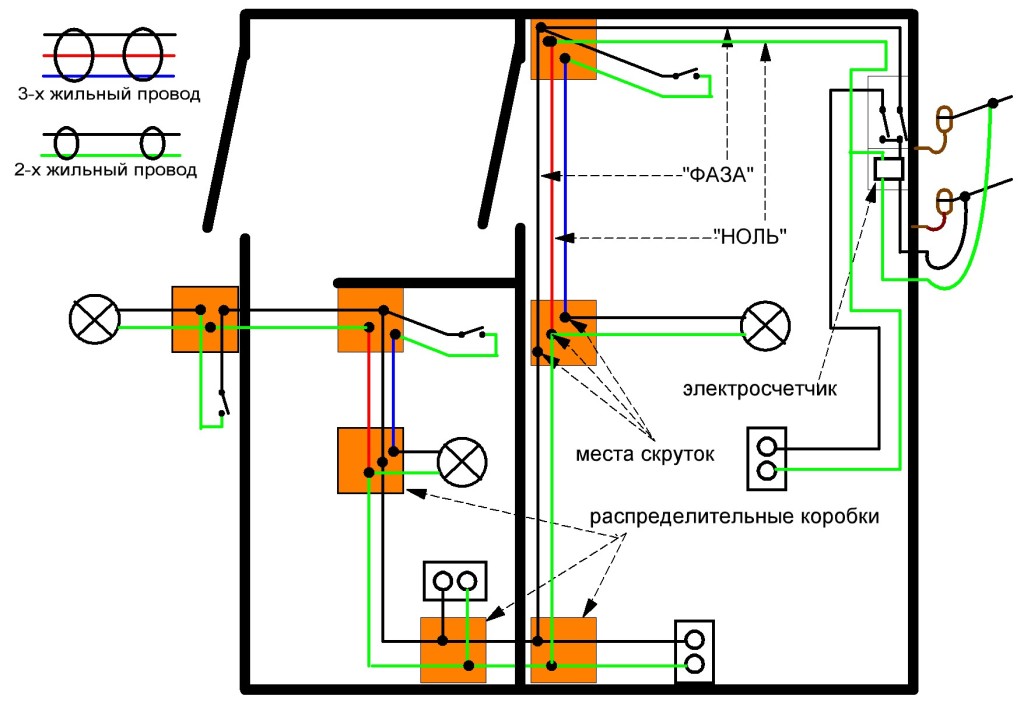
let's consider a typical scheme of a one-room apartment with two lines of electrical wiring, connected to 2 machines.
In this scheme, only 3 junction boxes are used, but often there is still a fourth for the corridor, but it can be combined into one with a box for a bathroom and a bathroom.
From the first the machine goes electric cable or wires to the corridor box, from which the lines go to the corridor lamp, switch, socket and jumper to the junction box of the room. Electric cables diverge from it to room 2-4 sockets, as well as to a double switch and a chandelier with three lamps and double switching.
From the second machine the line goes to the bathroom and bathroom junction box, from which wires go to 2 lamps and a block consisting of a double switch and socket. And also there is a jumper from it to the kitchen junction box, from which kitchen lamps and sockets are connected.
But there are variations here too.. For example, in a two-room apartment, one line is laid for two rooms, and the second for the rest of the premises. Or, for example, with three groups for a 3-room apartment - one machine for 2 rooms, the second for the corridor and the third room, the third for the bathroom, bathroom and kitchen.
Anyway it is always easy to determine the distribution of lines by simply turning off each machine in turn with a check of which sockets and lamps have stopped working.
How is the electrical wiring done in the apartment.
Let's start with the most common typical wiring diagram, which was widely used in brick and panel houses and apartments of past years, but even today is often used in new construction.
All electrical cables or wires run along the walls under the ceiling with descents to sockets switches and entries into the ceiling slab for lighting.
Wiring is always carried out in compliance with the rules, which I already wrote about in . For example, cables from switches and sockets rise strictly vertically and turn under the ceiling towards the junction box at a right angle. At the same time, they go horizontally under the ceiling at a distance of at least 15 centimeters.

All junction boxes from one machine are combined between themselves. Moreover, the first of them always comes with power from the electrical panel.
Always all electrical wires from all sockets, switches and lamps converge into a junction box, where they are connected according to.
In new houses today often electrical lines from the electrical panel go to the floor, and further along the wall they rise to the junction boxes, from which there are rises to the lamps and cables go down to the switches and sockets, which can be powered from one another by jumpers running in pipes in the floor.
Wiring in Khrushchev and other panel houses. Principles, scheme, features.
I will dwell in more detail on panel houses in which all electrical wiring is laid inside channels specially made at the factory to pull electrical wires into them.
All channels from sockets, switches and lamps converge into junction boxes, which have access to others and to the electrical panel.
Attention, in panel houses, pipes often do not go in a straight line, but at an oblique or along the shortest distance from the box to the outlet or switch, that is, without following the rules described in the first part of the article.
In Khrushchev, in which sockets are located near the baseboards, and the light is turned off with a rope switch under the ceiling- the wiring is done as follows. For your wire sockets go under the floor, and on lamps - under the floor neighbor who lives above you. Very often, installation is carried out without pipes and over the years the insulation with the wire crumbles, which is very dangerous. It will be very difficult and expensive to remake all the electrics in such panel houses!
During my many years of practice, I have collected many different schemes of different types of apartments and individual houses. In the future, I will definitely post them on the site.
Similar materials.
Living quarters for people are constantly being improved. More and more of them appear electrical appliances that improve life. Electricity consumption is growing, and the wires laid during construction are running out of resources: metal and insulation are aging, losing their properties from overloads, heating, ultraviolet radiation and mechanical stress.
Aluminum wiring, which has been in use since the times of the USSR, needs to be replaced for a long time. Increased safety requirements canceled the TN-C system, which did not provide for grounding of electrical appliances, the use of a potential equalization system, and protection against leakage currents.
The owners of old apartments do not always imagine how wires are placed in their premises, because there are many options for laying them.
Types of schemes
The main classification of electrical wiring is carried out according to the type of installation:
open;
closed.
The first method allows you to visually observe the passage of tracks. It is more affordable, most often used in wooden houses.
It is more difficult to detect wires hidden in walls, floors or ceilings: they are not visible. In each building, they were laid in different ways, but principles can be distinguished that take into account the construction period, wall materials, and installation technologies.
Aluminum wiring of a one-room apartment
Such a scheme is common, has been used for a long time, is well suited for a larger number of premises, and is easy to understand and implement.
In old houses on each floor there is switch box with a counter, a package switch for stress relief when working with metering devices and circuit breakers. All equipment is sectioned for each apartment separately.
![]()
Rice. 1. A variant of the old electrical wiring of a one-room apartment
For clarity, the picture shows two junction boxes in each room, but, most likely, the socket and lighting circuits are switched through one.
No ground loop is provided here. The circuit uses only zero and phase, and the neutral wire should never and nowhere be broken by switching devices. It is supplied directly to all consumers through junction boxes, and is taken from the meter.
Most likely, simple twists with or without welding were used to connect the wires, although there may be screw terminal blocks. Most of the wires are suitable for the zero assembly place.
The phase from the meter goes to the circuit breakers. In our example, one feeds all the sockets, and the other feeds the lamps of the rooms. If the apartment is equipped with an electric stove, then voltage is supplied to it through a separate machine, and the wires are used with increased power: up to 10 mm 2.
Schema variations are possible:
instead of automatic machines used;
electricians, when installing wires after the meter, mixed up the directions of the phase with zero (the circuit does not lose its operability, but is more dangerous);
a group of machines has been added and consumers are powered according to a different scheme, for example, for a corridor.
Each specific circuit should be carefully understood, it is quite possible that there are jumpers, additional wires, even installation without junction boxes.
To understand the principle of circuit design, a simple way helps:
turn on all lighting devices and use electrical appliances in sockets;
turn off consumers in turn by automatic machines in the switchboard and observe the extinguished lamps and disconnected devices in the sockets;
analyze changes, record or memorize information, draw conclusions.
Types of hidden wiring
In practice, highways are laid:
on the ceiling or inside it;
under the floor;
combined.
The layout of the wires inside the ceiling
It used to be widely used in brick and concrete panel buildings as the main wiring option. In modern construction, it is also often used.
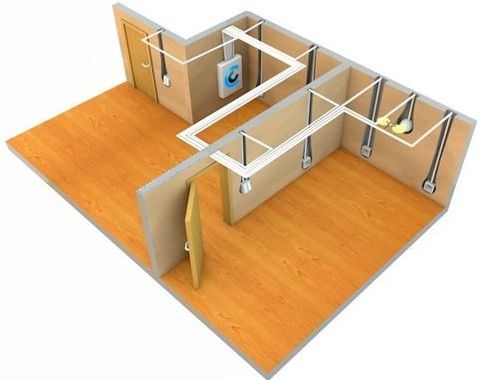
All routes with wires from the switchboard are directed vertically over the wall or inside it through strobes or built-in pipelines. The insides of ceiling tiles are usually made with channels for wiring, but chasing or hanging installation for suspended and stretch ceilings is allowed.
In the same way, the supply to the lamps, all switches and electrical sockets located on the walls.
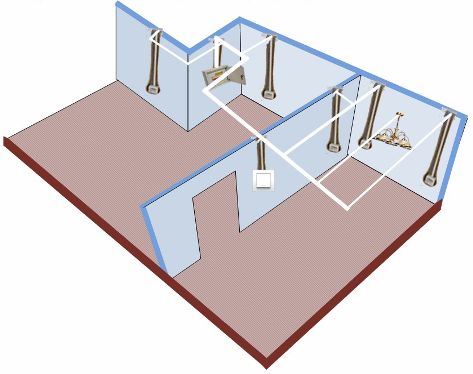
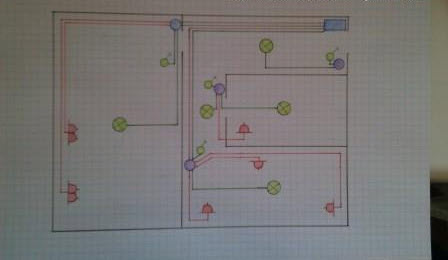
Rice. 2. Variant of the wiring diagram inside the ceiling
With a competent approach to installation, all wiring is oriented in perpendicular planes: this excludes damage to insulation and metal during future drilling of walls to fix various objects on them. Horizontal lines from the ceiling must not be lowered below 15 cm for the same reasons.
Distribution boxes are assigned to their machines to supply voltage to the nearest point. Installation in them is carried out according to the wiring diagrams.
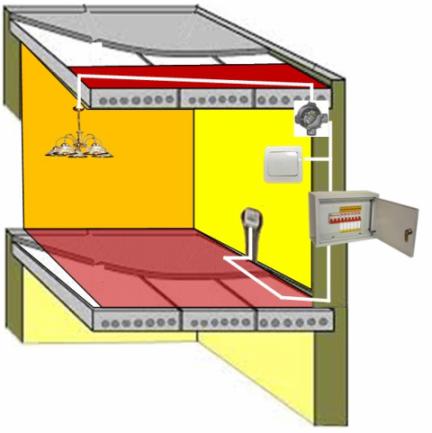
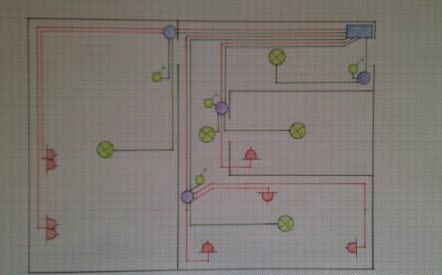
Underfloor wiring diagram
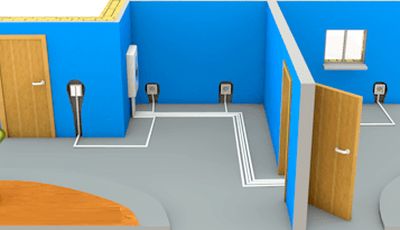
This option began to be used in new buildings with a rigid concrete base and the creation of strong pipelines from pipes under the floor covering, followed by pouring with solutions. Such measures reliably protect the insulation and metal from mechanical damage.
Cables and wires in the walls for sockets and lamps are protected by pipes or.

Rice. 3. Option scheme for laying electrical wiring under the floor
Combined wire placement methods
Both described methods are combined here, but such schemes have many separate nuances.
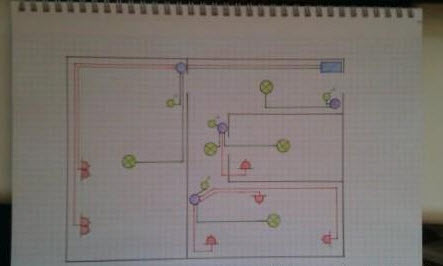
Factory panel houses
They have the insides of wall and ceiling slabs made by channels for laying electrical circuits. Routes connect all electrical consumers through junction boxes with introductory shield. Wires are pulled into these highways.
Please note that here the pipes may not be located under straight lines, but sharp corners. Their location can only be determined.
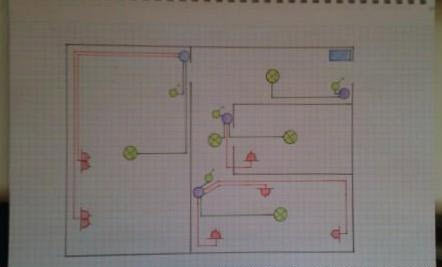
Rice. 4. A variant of the old electrical wiring in the apartment
Khrushchev-era houses
Panel old buildings used a fairly simple wiring layout, which significantly reduces construction technology, but is far from safe.
"Aluminum noodles" are brought to the sockets under the boards of the wooden flooring, and to the lamps it descends from under the floor of the upper neighbor through a hole in the ceiling slab. This is the most dangerous installation, which usually has no protection. Twisting without welding is often found here, and the insulation begins to collapse.
Such wiring must be completely redone, but this is a complex and expensive undertaking.
Each of the considered schemes may have different deviations from the project, even in neighboring apartments of the same house. They can be identified by a specialist by conducting electrical measurements. This work is often done under tension, which is dangerous.
Therefore, without a solid knowledge of safety rules and practical skills in working with electrical appliances, it is better not to take on the independent re-equipment of your apartment.
When buying an apartment in a new building, it becomes necessary to arrange electrical wiring. This is due to the fact that builders are usually limited to only plastering walls and pouring screed on the floor. When overhauling an old apartment, it is advisable to replace the wiring, since the old wiring, usually made aluminum wire, not designed to connect modern powerful household electrical appliances. In these cases, you will need.
If you decide to do all the work on installing electrical wiring with your own hands, then first of all you need to decide on those household electrical appliances that will be connected to the mains in your home. This will depend on the wiring diagram. The rules for power distribution in a one-room apartment will be the same for a two-room apartment, as well as for apartments with a large number of rooms.
In houses where the kitchen is equipped with an electric stove, a separate circuit will be required to connect it. And the wiring of this circuit according to safety rules must be carried out from force shield sufficient wire size. Also, this circuit will require the installation of a separate circuit breaker.
If there are other powerful household electrical appliances at home, such as washing machines, dishwashers, air conditioners, it is necessary to determine the exact location of their installation in the apartment. Such electrical appliances also require a separate circuit to be connected, made with a wire with a cross section of at least 2.5 mm². It is advisable to connect this circuit through your circuit breaker.

It is necessary to determine the placement of room light switches. They should be located in convenient accessible places, excluding their overlap when arranging furniture. The recommended height of room switches from the floor surface should not exceed 1.5 meters.
Room sockets should be located in close proximity to the connected household appliances. This will eliminate the need to pull additional extension cords. Room and other sockets should be placed no closer than 30 cm from the floor surface. This will rule out short circuit in case of flooding and water spills.
If you decide to do the wiring at home with your own hands, you should know that there are several typical wiring diagrams. The most famous circuits are series and parallel. In the first case, all elements electrical network switched on one after the other. This allows you to significantly save materials, but leads to the failure of the entire network if any one element fails. This is a huge minus, as a result of which such a scheme is practically not used in practice.
When connected in parallel, the power supply of the apartment and the house is devoid of this disadvantage. All electrical appliances are divided into separate groups, which are powered by their own circuits. In other words, parallel circuits are created, each of which performs its own task and can have its own protective automation. To make it easier to do electrical wiring with your own hands, consider the basic principles of its construction using the example of a one-room apartment.
![]()
First of all, in the hallway it is necessary to install a shield into which the supply power cable will be inserted. Its cross section must be at least 4 mm². An electric meter is mounted in the same shield and at least one socket is installed. It is necessary to connect power tools to be used when.
Protective circuit breakers are also installed in the shield for the circuit of sockets (room, corridor, kitchen), lighting circuits and circuits of powerful household appliances (dishwashers and washing machines, air conditioners). If an electric stove is installed in the house, it requires its own purpose with a circuit breaker.
Having wiring diagram wiring a one-room apartment with the designation of the required number of sockets and switches, it is easy to draw up a wiring diagram. It should indicate the exact location of the above elements and mounting boxes on the walls, as well as the location of the wire. A three-core wire (phase, zero, ground) with a cross section of at least 2.5 mm² is pulled to the sockets. Room and other lighting switches are connected with a two-wire wire of a smaller cross section - 1.5 mm².

Thus, for a one-room apartment, at least three parallel circuits (circuits) are required: a circuit of sockets, a lighting circuit, a circuit of powerful household electrical appliances. And as mentioned above, if an electric stove is installed, then in a one-room apartment you will need another circuit for it.
When doing do-it-yourself work, the wiring diagram is the main assistant in determining the amount of wire needed. Only one should take into account the fact that the laying of all wires along the walls is carried out only in horizontal and vertical directions, and turns only at right angles. Laying the wire diagonally on the wall is unacceptable. In the future, if necessary, hammer a nail into the wall, such an arrangement of the wire can lead to its accidental damage. Therefore, it is recommended to lay wires under the ceiling no closer than 15 cm to it, and above the floor no closer than 30 cm to its surface. If you do all the installation work with your own hands, it is advisable to have a detailed wiring diagram, or a photo of the already installed wiring while it is still visible. Such a precaution will help you find out where the cable is laid, and save you from possible problems in the future.

Do-it-yourself wiring installation requires a set of tools. The set depends on how the wire will be installed. If by laying in special channels (strobes), then you can’t do without a “grinder” with a circle on concrete and brick. In the same case, materials such as cement or plaster mortar, alabaster will be needed for the subsequent sealing of the strobes. If in an external way, then the “grinder” will be replaced by a drill or puncher to drill holes for fastening cable channels or installing special clips. You will need a tester or meter for the presence of a phase (phase probe), wire cutters, pliers, a screwdriver, electrical tape, a pencil (marker).
The presence of stretch or suspended ceilings in it will greatly facilitate the installation of electrical wiring in a one-room apartment. In this case, all mounting boxes can be placed behind them, avoiding additional work on their installation in the walls. From the ceiling to the connection points of room switches and sockets, the required wires will descend to the required height. The principle of wiring for a two-room (or more) apartment is similar to the scheme described above.
Video "House Wiring Diagram"
How to draw a diagram
You can’t do without a detailed diagram when installing electrical wiring with your own hands. And not because you have a bad memory, but because mistakes in this matter are unacceptable. And only a detailed presentation on paper of all the details will help to avoid them. Consider the basic principles of drawing up a diagram for each of the main circuits.
Sockets
When drawing up a circuit diagram of sockets, it is necessary to take into account the requirement to install it only with a three-wire wire, one of the cores of which serves as grounding. Moreover, in no case, for safety reasons, radiators and pipes passing through the apartment should be used for grounding. For grounding in new houses, a special bus is mandatory. In houses of old construction, to resolve this issue, you should contact the electrician of the service organization.
If the circuit diagram of sockets and lighting circuits are displayed on the same sheet of paper, then in order to avoid confusion, it is recommended to designate them in different colors. For example, the socket circuit is in red, and the lighting circuit is in blue.
When drawing up a diagram, some rules should be taken into account. So, in the toilet room, the placement of sockets is not allowed. In the bathroom, it is allowed to install a socket only through an isolating transformer. This precaution will help prevent electric shock.
For safety reasons, it should be installed no closer than half a meter to the stove. There must be a sufficient number of them to allow you to turn on all the necessary electrical appliances without the use of extension cords. The socket for a powerful load (dishwasher) must be connected on a separate circuit through a circuit breaker.
lighting

The lighting circuit in the house is made with a two-wire wire and does not require grounding. One of the rules is to connect the breaking contact of the circuit breaker only to the phase conductor.
Depending on how many modes of operation the lighting device is designed for, a switch (one or two-key) and a wire supplying electricity to it are selected. For a two-gang switch that provides two modes of operation, a three-wire wire is required, which must be displayed on the diagram.
Wire strips
When drawing up a wiring diagram, which will be needed to calculate the amount of material needed, some rules must be observed. First of all, as mentioned above, this is only a vertical or horizontal laying, the location is not closer than 30 cm to the floor and 15 cm to the ceiling, the indent to door and window openings is not less than 15 cm.
Lighting devices are usually placed in the middle of the ceiling. This place is easy to determine by measuring the length and width of the room. It is also necessary to take into account the presence of a channel in the floor panel and the possibility of laying a cable in it. When installing a suspended or stretch ceiling in a room, a different approach is possible. The main power cables and junction boxes are hidden behind the ceiling, and the necessary wires are pulled to the sockets and switches from above. Such a solution will greatly simplify the work and save material. The laying diagram must be preserved in case of repair.
All work that is somehow related to electricity in the house will require a competent and serious approach from you, so the wiring diagram in an apartment or private house must be well thought out, and most importantly, correctly and efficiently manufactured. It is from the electrical circuit and its installation that repairs in new housing or major repairs in the old one will begin. The sequence of actions for installing wiring in the house will be as follows. Firstly, wiring is laid along the walls, which will subsequently be covered with plaster and wallpaper. Under this finish, all electrical wiring will lie for many years and will not bother you. For this, before starting installation, you need to very carefully calculate the entire wiring plan of the apartment.
Wiring diagrams - where to start?
Most often, when the turn of laying electrical wiring in a house or apartment comes up, people do not imagine the end result. And the wiring diagram should be presented in colors. This is because the overall functionality, as well as the correctness and consistency, etc., will directly depend on the correctness of the scheme. The wiring diagram of a house or apartment will always begin with one thing - thinking through the plan of the entire electrician. Let's explain why. Let's say you've completed a repair without thinking about the end result. We finished all the repairs, put furniture and household appliances and ... You can get a bunch of problems.
Sockets and switches may be closed by a sofa or cabinet, and where it is needed it is not there and vice versa. And in such cases, you will begin with pleasure to unwind extension cords throughout the apartment to the necessary electrical receivers. Naturally, you do not want such a new electrical wiring in the apartment. Errors in flats are still comparatively tolerable. But if the house wiring diagram is done incorrectly in a private house, then this promises more serious problems. This is because apartments usually undergo major repairs with the replacement of wiring every 20-25 years. But in private homes, this is all done either much less often, or never done at all. Assume that a mistake is made in a multi-story building, then the problems will seem even more fun.
In order to avoid all such problems, you just need to calmly think over everything and decide how to put household appliances and furniture in the house. It is also worth noting that in the near future you will buy and will depend on electricity. All these questions are best discussed with the family, because everyone will have their own vision of the situation, which will not be superfluous.
Related articles:
Wiring diagram - power section
So, you've thought it all out. Now you need to start putting all the plans and ideas that have appeared on paper. Draw a plan for your home. For example, we will disassemble a standard one-room apartment, but everything is exactly the same for a private house. In order to complete the wiring diagram of the apartment wiring, you will need a sheet of paper, a pen, a ruler, colored markers or pencils.
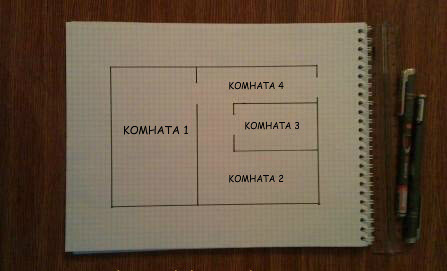
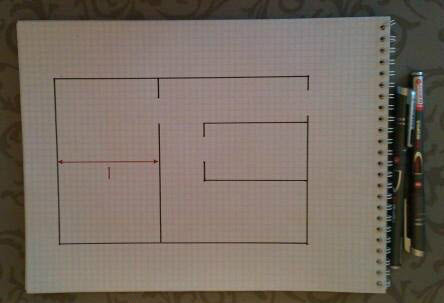
On the diagram you need to indicate the location of doorways and walls. Exact dimensions are not needed, only the general position is required. If you have not yet learned, then we advise you to refer to the article of the same name.
For example, the following picture should turn out.

For a complete presentation and simplicity, number and sign all the rooms:
- No. 1 - hall;
- No. 2 - kitchen;
- No. 3 - bathroom;
- No. 4 - entrance hall.
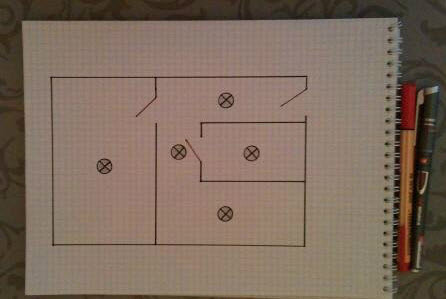
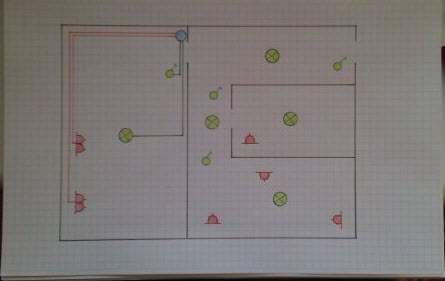
After that, you need to put on the electric circuit of the place in which it will be located Appliances and furniture. All items must be numbered, labeled and highlighted by the color of electricity consumers.
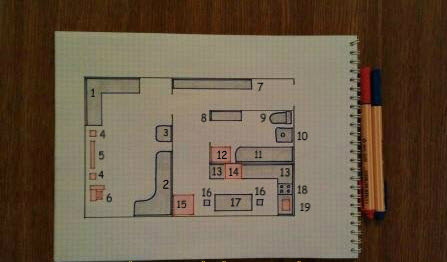
It is for consumers of electricity, highlighted in red, that sockets will be needed. Now you need to simplify your circuit, i.e. we remove all items, and in those places where the electronics will be located, we will put the designations of sockets on the wiring plan. It should look like the following.

It will not be superfluous to apply used in the scheme conventions to avoid confusion.

The specific dimensions and location of the sockets will need to be indicated on the diagram after you decide on the exact locations of the electronics and furniture.
Electrical diagram in the apartment - lighting part
In this example, all lighting fixtures will be in the center of the room. Let's start with the first room - the hall. The coordinates of the location of the lamps, if you know the exact dimensions of the room, you can indicate in the first place. In our case, we do not have exact dimensions, so we will carry out all the necessary measurements during the first stage of installation, i.e. marking. With the definition of the center, we hope, there should be no problems. But just in case, let's say that first you measure the width of the room, and divide the resulting measurement in half.
The same must be done with the length of the room, i.e. measure and divide by half. This way you will get the coordinates of the middle of the room. According to these obtained coordinates, you need to designate the center of the room and mark it with a cross on the diagram.

In exactly the same way, designate the middle of all rooms.
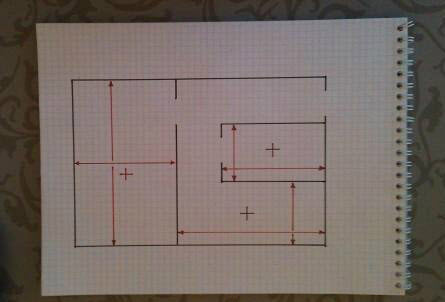
The entrance hall, which is L-shaped in shape, needs to be divided into 2 parts and also marked out.
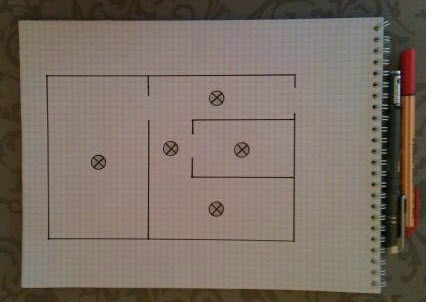
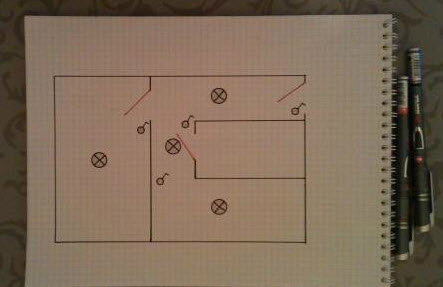
If you change the applied crosses to the symbols of lighting devices, you get a similar wiring diagram.
To complete the wiring diagram at home with your own hands, you need to apply switches. To do this, it is necessary to determine the location interior doors. By the way, have a look, useful article. Here you need to understand in which direction the door will open, i.e. inward or outward, as well as to the right or left. This must be done so that the installed switch is not behind any door.
The next step is to apply switches to the wiring diagram. Usually they are located inside the rooms in such a way that when entering the room and opening the door, one could turn on the light without any problems, and turn it off when leaving. The exception will be rooms with high humidity - bathrooms and bathrooms.. This is due to the fact that the constant ingress of moisture will quickly disable the switches, unless, of course, special devices with increased protection are used.
Draw the switches on your circuit using the legend. Before starting the installation of electrical wiring on the diagram, it is necessary to apply the exact dimensions to the switches - the distance from the doors, as well as the height from the floor.
As a result, you will draw up two wiring diagrams - a socket diagram and a circuit of switches and fixtures. The first stage is over. Now you have the main part of the electrical circuit.
Wiring diagram
First you need to think over and calculate the entire wiring route in the house. To do this, it is necessary to conduct an inspection in the room in which the work is planned. It is also necessary to decide on the finishing work that will be carried out. Namely, you need to know: what the ceilings will be, whether the plaster will be performed and its thickness, where the load-bearing walls are, whether it will be necessary. Let's look at all this with an example.
For example, you are planning to stretch ceiling. In terms of wiring, this option is just great. In this case, all the work on laying electrical wiring can be done independently, as well as save a lot of time and effort, as well as materials. This is due to the fact that combined wiring can be used. That is, the installation of cables is carried out on the draft ceiling in corrugated non-combustible pipes, and the descents to the switches and sockets are carried out in the walls - in the strobes.
This method of wiring installation has the following advantages.
If it is necessary to replace the electrical wiring, all work is carried out without updating the plaster layer, and no hard work is required to arrange the strobe. But it is the preparation of channels for laying cables that takes up the bulk of the working time. Also, you do not need to stretch them through the channels of the ceiling. This also allows you to save your strength, because. channels are not always clean. In addition, the consumption of wires is greatly reduced. This is due to the fact that during the laying along the walls you need to bypass various obstacles, and if you lay along the ceiling, then the wiring is carried out along the shortest path.
If your wiring will be carried out in the standard way along the walls, then you need to pay attention to the following points.
- We recommend avoiding concrete floors above doors and windows. This is due to the fact that it is very difficult to make strobes in them, and the second reason will be problems during the installation of cornices or curtains for hanging curtains.
- It is necessary to correctly find the channels in the floor slabs, because they will need to lay wiring for lamps.
- Accurately calculate the location of the junction boxes. If this is done correctly, then you can also significantly reduce the consumption of material during the installation of electrical wiring.
- If your house is monolithic concrete, then you need to draw up a circuit of switches and sockets in such a way that they do not fall on the main supporting structures, because. it is highly undesirable to violate their integrity.
After taking into account the above nuances, you can begin to draw up a wiring diagram. To do this, you need to use the schemes that turned out at the first stage of preparation. Wiring diagrams should be superimposed on each other and the overall picture will be obtained.

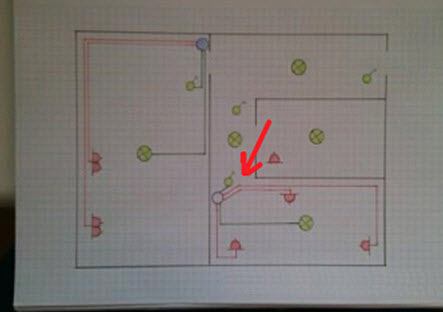
We start with the first room in the house. There will be ordinary ceilings for painting. Therefore, here the installation will be carried out along the walls, and for the chandelier it will be laid in the channels of the ceiling slab. Also in this room there are two double sockets, a switch and a chandelier. The wire should be pulled from the farthest corner, because. the first double socket in the circuit is located there. You need to stop at the exit from the premises, because. there will be a junction box.

It is not recommended to make sockets with a loop, because. this will greatly reduce the power of the last socket in the circuit. It will be more reliable and correct to make all connections in the switch box. Therefore, you need to lead the wire directly from each outlet to the box. Draw the cable route from the second double outlet.
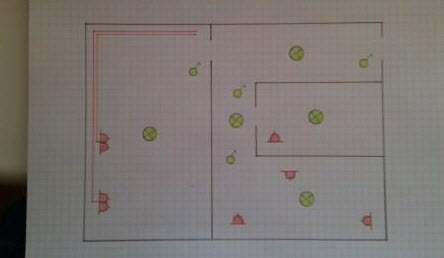
After that, sketch the wire from the chandelier to the junction box.

When all the cables are collected in one place, it is necessary to designate a place for the junction box itself.
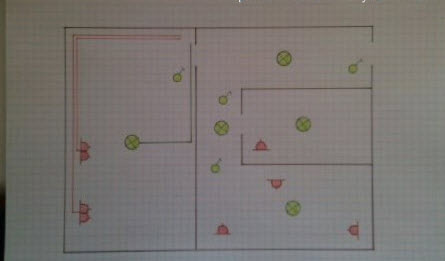
In the same way, you need to designate the routes for laying wiring in other rooms. Electrical wiring in the kitchen - here you can use channels in floor slabs to reduce the wire path from one of the outlets. By passing them through these channels, you save both material and your time.
Making a wiring diagram in the bathroom.
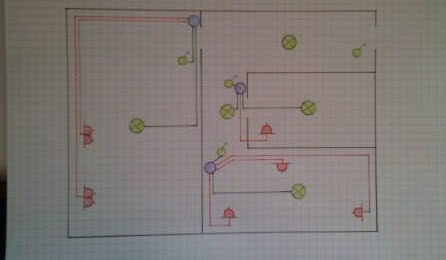
Schematic in the hallway. In this room, it is planned to install a false ceiling made of plastic, and therefore it is possible to throw electrical wiring along the ceiling in corrugated tubes.
After the above manipulations, designate a place to find the force shield. As a rule, it is located near the entrance to the apartment.
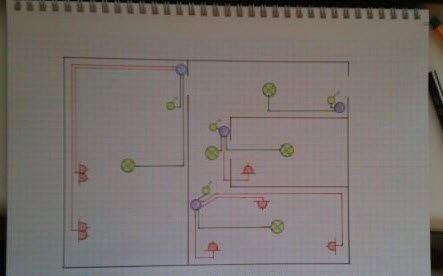
Begin. From the hall to the shield.
From the kitchen to the shield.
From the bathroom to the power shield.

And finally, from the hallway to the shield.
So a wiring diagram for an apartment or a private house has been drawn up, and then you can put it into practice without looking back.
The next step for the installation of electrical wiring in the house will be the calculation of the wire cross section. It is extremely undesirable to neglect such a calculation, because each equipment has its own power consumption, which the supply wire must withstand. Well, after that you will definitely have to figure it out.